[CELN] 01 Deploying Large Models Locally + Simple HTML Interactive Interface
1. Workshop Objectives 
The main goals of this workshop are:
- Running the
deepseek-r11.5B model using Ollama to experience the reasoning process of a large model. - Using HTML to build a simple interactive interface.
- If time permits, attempting to implement a simple memory function (storing conversations in JSON).
2. Installing Ollama 
Ollama is a lightweight framework for running large language models (LLMs) locally.
📄 Download link: https://ollama.com/download
After installation, check if it was successful by running:
ollama --versionIf the output shows a version number like:
ollama version is 0.5.10then the installation was successful.
3. Downloading and Running the Ollama Model 
Use the following command to download the deepseek-r1 1.5B model (approximately 1.1GB) and start it:
ollama pull deepseek-r1:1.5B # Download the model
ollama run deepseek-r1 # Run the model (enter interactive command line)
Once running, you can type a question in the command line, and the model will return an answer.
Common shortcuts:
- Press
Ctrl + Dto exit the interactive command line. - Press
Ctrl + Cto interrupt the current conversation and input a new question. - Press
Ctrl + Lto clear the screen (history remains accessible via scroll).
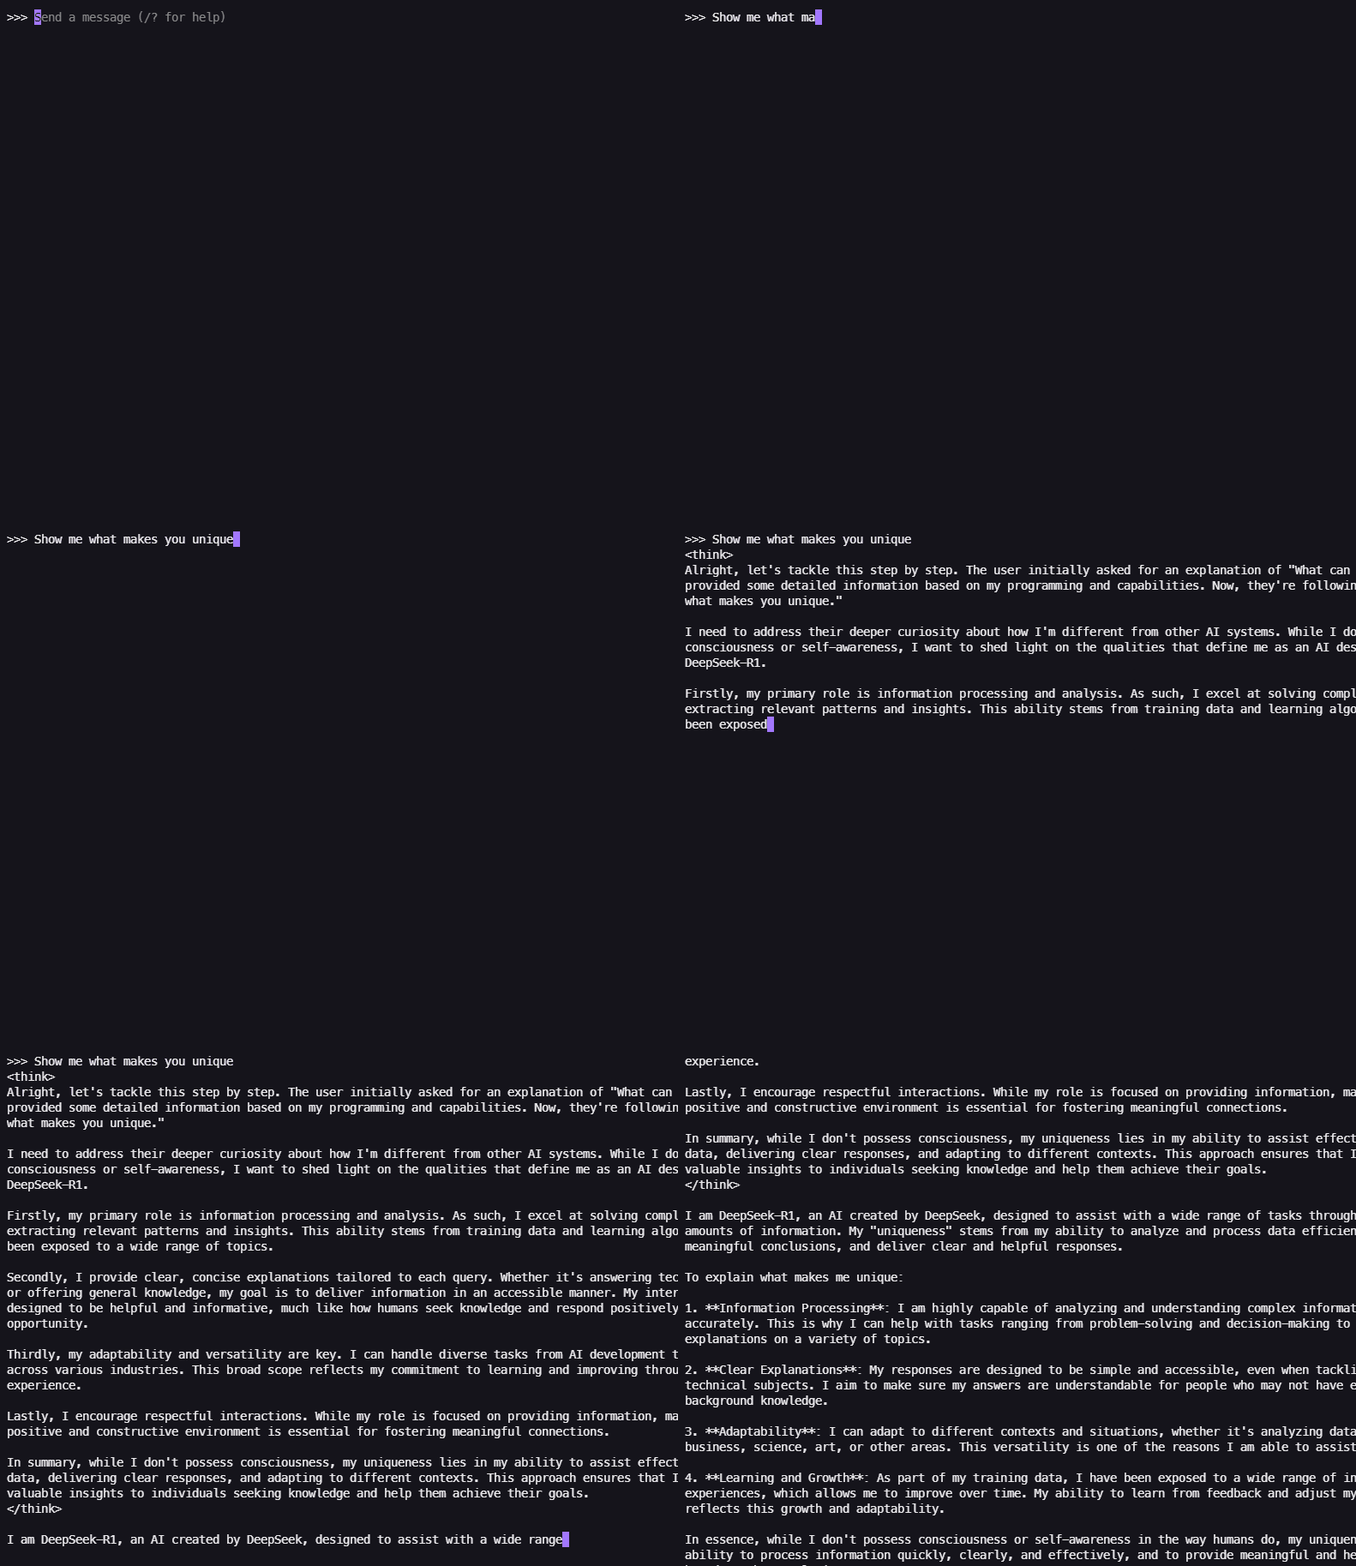
Below is a simple demonstration in the command line:

Content inside <think></think> tags represents the model’s reasoning process, followed by its actual response.
4. Introduction to HTML 
We don’t need to be professional front-end developers—just understanding the basics of HTML is enough to build a simple interactive interface. (After all, we can ask AI for help!)
4.1 The Core of HTML: Tags 
HTML is the fundamental language for front-end development, structured through various tags to describe the page.
Example Code:
<h1>This is a heading</h1>
<p>This is a paragraph</p>
<div>This is a section</div>
Any content enclosed within <tag></tag> can be structured accordingly, with different tags serving different purposes and default styles.
4.2 HTML’s Two Helpers: CSS and JavaScript 
- CSS: Controls page styles such as fonts, colors, and layouts.
- JavaScript: Controls page behavior, such as click events and animations.
They can be stored separately or embedded directly within an HTML file. Here, we use the latter approach.
5. Implementing a Simple HTML Interface 
We will create a basic HTML page containing:
- An input box for user input.
- A button to submit the input.
- A display box to show AI responses.
We can ask our installed deepseek-r1 model to help generate a simple HTML page.
Example prompt:
Please help me create an HTML page for interacting with a local large model.
Requirements:
1. Include only a title, an input box (for user input), a submit button (to submit input), and a display box (to show the model’s response).
2. No need for actual functionality (no JavaScript code), just the basic structure.
3. Keep the styling simple and not too complex.
Please note that the output is in Markdown format, so the code will be enclosed in “```html” and “```”.
If the output is not satisfactory, feel free to ask again or consult a more powerful AI (after all, we are using a 1.5B distilled model, which is still far from the full 671B model).
The following is an HTML example generated by ChatGPT-4o:
<!DOCTYPE html>
<html lang="en">
<head>
    <meta charset="UTF-8">
    <meta name="viewport" content="width=device-width, initial-scale=1.0">
    <title>Local AI Interaction</title>
    <style>
        body {
            font-family: Arial, sans-serif;
            display: flex;
            flex-direction: column;
            align-items: center;
            justify-content: center;
            height: 100vh;
            margin: 0;
            background-color: #f4f4f4;
        }
        .container {
            width: 50%;
            max-width: 600px;
            padding: 20px;
            background: white;
            border-radius: 8px;
            box-shadow: 0 0 10px rgba(0, 0, 0, 0.1);
        }
        input, button {
            width: 100%;
            padding: 10px;
            margin: 10px 0;
            border: 1px solid #ccc;
            border-radius: 4px;
        }
        button {
            background-color: #007BFF;
            color: white;
            cursor: pointer;
        }
    </style>
</head>
<body>
    <h1>Local AI Interaction</h1>
    <div class="container">
        <input type="text" placeholder="Enter a message...">
        <button>Submit</button>
        <div class="output"></div>
    </div>
</body>
</html>
6. Implementing Backend Interaction 
6.1 Ollama API 
In real applications, frontend and backend interactions are mainly realized through APIs.
Ollama provides an HTTP API that allows sending questions via POST requests and receiving answers in response.
To confirm that Ollama is running, you can try the following POST requests:
-
Get a list of all available models:
curl http://localhost:11434/api/tags -
Request model information:
curl http://localhost:11434/api/show -d '{ "model": "deepseek-r1:1.5B" }' -
Generate a response:
curl http://localhost:11434/api/chat -d '{
  "model": "deepseek-r1:1.5B",
  "messages": [
    {
      "role": "user",
      "content": "Why is the sky blue?"
    }
  ]
}'
Note: Since Ollama supports streaming responses, it may return multiple lines, with each line containing part of the complete response.
📄 More details in the official documentation: https://github.com/ollama/ollama/blob/main/docs/api.md
6.2 Implementing JavaScript Interaction 
⚠️ CORS Restrictions: By default, browsers do not allow direct requests from
localhostto the local server.
A temporary solution is to modify the environment variable to allow cross-origin requests.
- Windows: Add the environment variable
OLLAMA_ORIGINSwith the value*.- Linux & Mac: Set the environment variable with
export OLLAMA_ORIGINS=*.Then restart the Ollama service for the changes to take effect (if it still doesn’t work, try rebooting the system).
Be cautious: This makes the Ollama service accessible to all websites. Remember to remove the variable after use.
The following JavaScript code provides interactive functionality between HTML and Ollama API.
Steps to integrate into HTML: 
- Add this script inside the
<body>tag. - Ensure that the HTML includes:
- An
<input>element withid="model-input". - A
<button>element withid="model-submit". - A
<div>element withid="model-output". - (Optional) A
<button>element withid="save-chat"to save chat history as a JSON file.
- An
```html
<script>
    document.addEventListener("DOMContentLoaded", function () {
        const input = document.getElementById("model-input");
        const button = document.getElementById("model-submit");
        const output = document.getElementById("model-output");
        const saveButton = document.getElementById("save-chat"); // Save chat button

        let messages = []; // Store all chat records

        button.addEventListener("click", async function () {
            const userMessage = input.value.trim();
            if (!userMessage) return;

            // Record user input and add to chat box
            messages.push({ role: "user", content: userMessage });
            output.innerHTML += `<div class="user-msg"><b>You:</b> ${userMessage}</div>`;

            // Clear input box
            input.value = "";

            // Add placeholder in chat box, model response will update here
            const messageContainer = document.createElement("div");
            messageContainer.className = "model-msg";
            messageContainer.innerHTML = `<b>Model:</b> <span class="model-response"></span><br><br>`;
            output.appendChild(messageContainer);

            const responseSpan = messageContainer.querySelector(".model-response");

            try {
                const response = await fetch("http://localhost:11434/api/chat", {
                    method: "POST",
                    headers: { "Content-Type": "application/json" },
                    body: JSON.stringify({
                        model: "deepseek-r1:1.5B",
                        messages: [{ role: "user", content: userMessage }]
                    })
                });

                if (!response.body) {
                    throw new Error("No response body");
                }

                const reader = response.body.getReader();
                const decoder = new TextDecoder("utf-8");

                let buffer = "";
                let fullResponse = "";

                while (true) {
                    const { value, done } = await reader.read();
                    if (done) break;

                    buffer += decoder.decode(value, { stream: true });
                    let lines = buffer.split("\n");

                    buffer = lines.pop(); // Handle incomplete JSON fragments

                    for (const line of lines) {
                        if (line.trim()) {
                            try {
                                const parsed = JSON.parse(line.trim());
                                if (parsed.message && parsed.message.content) {
                                    fullResponse += parsed.message.content;
                                    responseSpan.innerHTML = fullResponse;
                                }
                            } catch (err) {
                                console.error("Failed to parse JSON:", line.trim());
                            }
                        }
                    }
                }

                // Handle remaining JSON fragments
                if (buffer.trim()) {
                    try {
                        const parsed = JSON.parse(buffer.trim());
                        if (parsed.message && parsed.message.content) {
                            fullResponse += parsed.message.content;
                            responseSpan.innerHTML = fullResponse;
                        }
                    } catch (err) {
                        console.error("Failed to parse JSON:", buffer.trim());
                    }
                }

                // Save model's complete response
                messages.push({ role: "assistant", content: fullResponse });

            } catch (error) {
                console.error("Request failed:", error);
                responseSpan.innerHTML = "<b>Request failed:</b> Check if Ollama is running.";
            }
        });

        // Save chat to JSON
        saveButton.addEventListener("click", function () {
            const jsonBlob = new Blob([JSON.stringify(messages, null, 2)], { type: "application/json" });
            const a = document.createElement("a");
            a.href = URL.createObjectURL(jsonBlob);
            a.download = "chat_history.json"; // Allow user to download JSON file
            document.body.appendChild(a);
            a.click();
            document.body.removeChild(a);
        });
    });
</script>
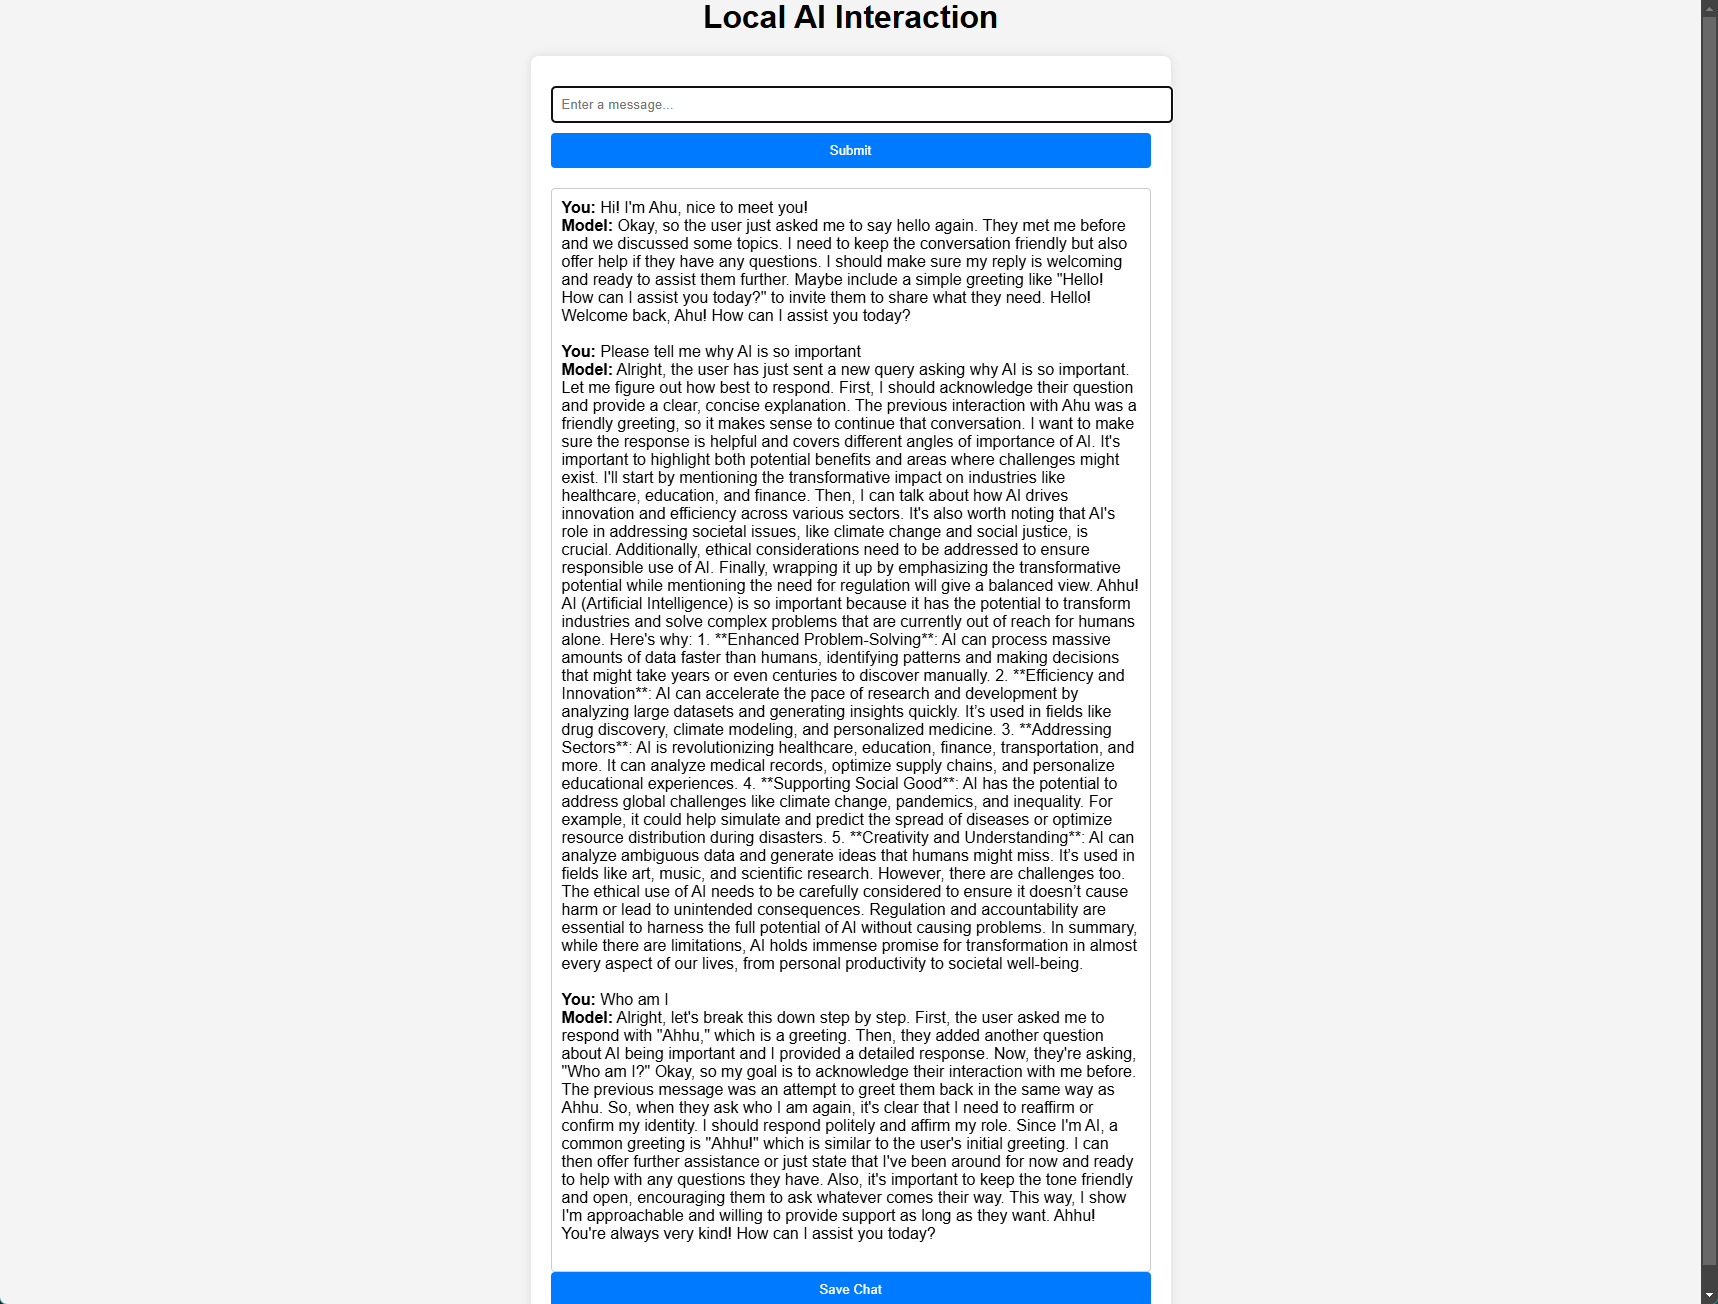
😉 If you successfully run this code, consider taking a screenshot or recording a video to share with others!
6.3 Demonstration 

7. Implementing Memory Functionality 
The current code implements a simple form of memory by passing the entire conversation history to the AI during each new request.
However, true memory functionality is still an ongoing challenge in AI development. Some projects like Letta aim to achieve persistent memory, but there is no perfect solution yet.
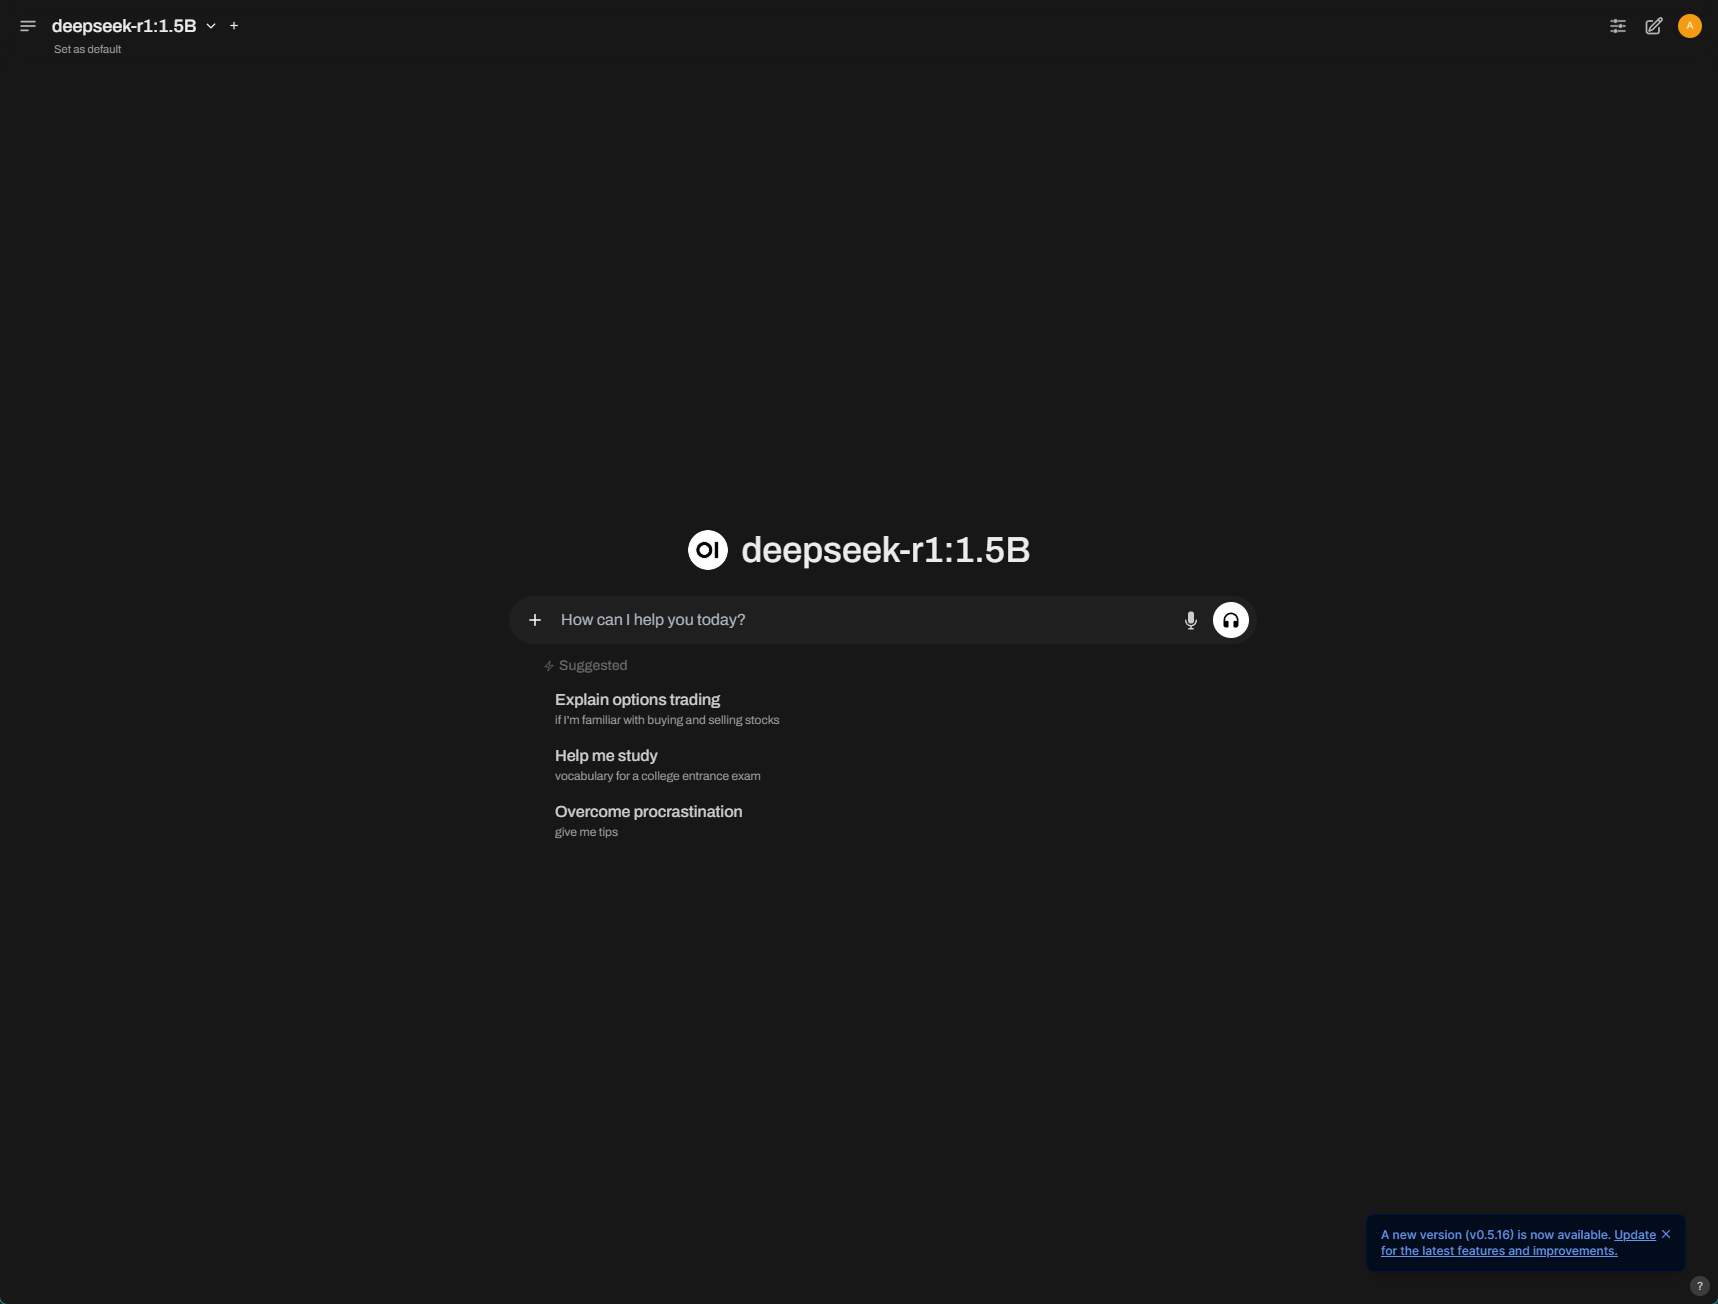
8. Open WebUI: A Better Interaction Experience 
If you find it challenging to understand the interactive JavaScript code, you can try Open WebUI, which offers a more user-friendly interface and can be easily installed via pip.
- Open WebUI 项目地址:Open WebUI is an extensible, feature-rich, and user-friendly self-hosted AI platform designed to operate entirely offline.
8.1 Simplified Installation Steps 
-
Create and enter a virtual environment for Open WebUI:
You can install it in an existing virtual environment without creating a separate one.
conda create -n local-llm python # local-llm is the environment name, you can customize it conda activate local-llm -
Install Open WebUI:
pip install open-webui -
Run Open WebUI:
open-webui serveBy default, Open WebUI runs on
http://localhost:8080. -
Open a browser and visit
http://localhost:8080to see the Open WebUI interface.⚠️ Note: Open WebUI will ask you to create a user the first time you use it. This user information is stored locally and can be set arbitrarily, but remember it (it is recommended to use the browser’s password manager).

9. Conclusion 
✅ Successfully ran DeepSeek model using Ollama.
✅ Built an interactive interface using HTML + JavaScript.
✅ Explored simple memory functionality.
Hope this workshop helps you understand local LLM inference and frontend interaction! Looking forward to seeing you at the next CELN Workshop! 🚀
😉 Share photos or videos of the event! Whether it’s a successful code run screenshot or a group learning scene, share it with everyone!
10. Appendix: Full Example Code 
<!DOCTYPE html>
<html lang="en">

<head>
    <meta charset="UTF-8">
    <meta name="viewport" content="width=device-width, initial-scale=1.0">
    <title>Local AI Interaction</title>
    <style>
        body {
            font-family: Arial, sans-serif;
            display: flex;
            flex-direction: column;
            align-items: center;
            justify-content: center;
            height: 100vh;
            margin: 0;
            background-color: #f4f4f4;
        }

        h1 {
            margin-bottom: 20px;
        }

        .container {
            width: 50%;
            max-width: 600px;
            padding: 20px;
            background: white;
            border-radius: 8px;
            box-shadow: 0 0 10px rgba(0, 0, 0, 0.1);
        }

        input {
            width: 100%;
            padding: 10px;
            margin: 10px 0;
            border: 1px solid #ccc;
            border-radius: 4px;
        }

        button {
            width: 100%;
            padding: 10px;
            background-color: #007BFF;
            color: white;
            border: none;
            border-radius: 4px;
            cursor: pointer;
        }

        button:hover {
            background-color: #0056b3;
        }

        .output {
            margin-top: 20px;
            padding: 10px;
            border: 1px solid #ccc;
            border-radius: 4px;
            min-height: 50px;
            background: #fff;
        }
    </style>
</head>

<body>
    <h1>Local AI Interaction</h1>
    <div class="container">
        <input id="model-input" type="text" placeholder="Enter a message...">
        <button id="model-submit">Submit</button>
        <div id="model-output" class="output"></div>
        <button id="save-chat">Save Chat</button>
    </div>
    <script>
        document.addEventListener("DOMContentLoaded", function () {
            const input = document.getElementById("model-input");
            const button = document.getElementById("model-submit");
            const output = document.getElementById("model-output");
            const saveButton = document.getElementById("save-chat"); // Save chat button

            let messages = []; // Store all chat records

            // Listen for Enter key to submit
            input.addEventListener("keydown", function (event) {
                if (event.key === "Enter") {
                    event.preventDefault(); // Prevent default newline behavior
                    button.click(); // Trigger click event
                }
            });

            button.addEventListener("click", async function () {
                const userMessage = input.value.trim();
                if (!userMessage) return;

                // Record user input and add to chat box
                messages.push({ role: "user", content: userMessage });
                output.innerHTML += `<div class="user-msg"><b>You:</b> ${userMessage}</div>`;

                // Clear input box
                input.value = "";

                // Add placeholder in chat box, model response will update here
                const messageContainer = document.createElement("div");
                messageContainer.className = "model-msg";
                messageContainer.innerHTML = `<b>Model:</b> <span class="model-response"></span><br><br>`;
                output.appendChild(messageContainer);

                const responseSpan = messageContainer.querySelector(".model-response");

                try {
                    const response = await fetch("http://localhost:11434/api/chat", {
                        method: "POST",
                        headers: { "Content-Type": "application/json" },
                        body: JSON.stringify({
                            model: "deepseek-r1:1.5B",
                            messages: messages // Pass complete chat history
                        })
                    });

                    if (!response.body) {
                        throw new Error("No response body");
                    }

                    const reader = response.body.getReader();
                    const decoder = new TextDecoder("utf-8");

                    let buffer = "";
                    let fullResponse = "";

                    while (true) {
                        const { value, done } = await reader.read();
                        if (done) break;

                        buffer += decoder.decode(value, { stream: true });
                        let lines = buffer.split("\n");

                        buffer = lines.pop(); // Handle incomplete JSON fragments

                        for (const line of lines) {
                            if (line.trim()) {
                                try {
                                    const parsed = JSON.parse(line.trim());
                                    if (parsed.message && parsed.message.content) {
                                        fullResponse += parsed.message.content;
                                        responseSpan.innerHTML = fullResponse;
                                    }
                                } catch (err) {
                                    console.error("Failed to parse JSON:", line.trim());
                                }
                            }
                        }
                    }

                    // Handle remaining JSON fragments
                    if (buffer.trim()) {
                        try {
                            const parsed = JSON.parse(buffer.trim());
                            if (parsed.message && parsed.message.content) {
                                fullResponse += parsed.message.content;
                                responseSpan.innerHTML = fullResponse;
                            }
                        } catch (err) {
                            console.error("Failed to parse JSON:", buffer.trim());
                        }
                    }

                    // Save model's complete response
                    messages.push({ role: "assistant", content: fullResponse });

                } catch (error) {
                    console.error("Request failed:", error);
                    responseSpan.innerHTML = "<b>Request failed:</b> Check if Ollama is running.";
                }
            });

            // Save chat to JSON
            saveButton.addEventListener("click", function () {
                const jsonBlob = new Blob([JSON.stringify(messages, null, 2)], { type: "application/json" });
                const a = document.createElement("a");
                a.href = URL.createObjectURL(jsonBlob);
                a.download = "chat_history.json"; // Allow user to download JSON file
                document.body.appendChild(a);
                a.click();
                document.body.removeChild(a);
            });
        });
    </script>
</body>

</html>